If you have ever wondered how you can pull all the links to your accounts into one place so that it’s easy to share, then you are probably thinking of a linktree.
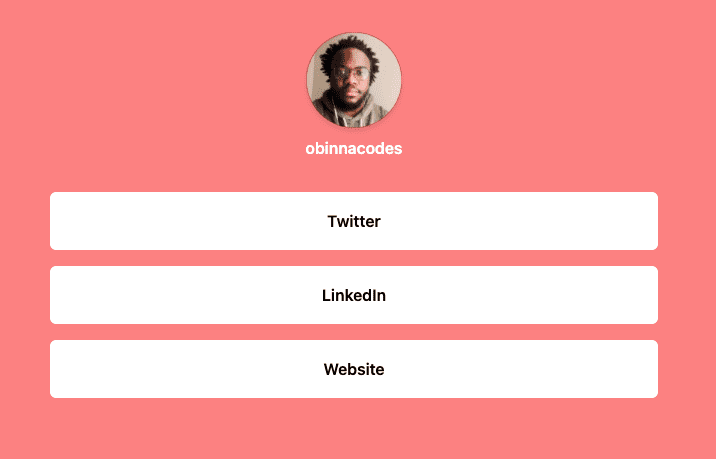
I know, Linktree? The name sounds a bit weird, No! It’s not a tree filled with links, it’s actually a webpage that contains links to other web pages. At the end of this tutorial, you will build something like this.
Prerequisite:
This tutorial assumes that you have a knowledge of the following:
- Javascript ES6 functions
- DOM manipulation APIs
- An understanding of how Serverless functions work
It also assumes you have wrangler which is the Workers CLI installed globally on your computer and connected to your Cloudflare dashboard.
- You can checkout how to install wrangler on your computer in the documentation.
Setting up
In this tutorial, we will be using wrangler to set up a project, by running wrangler generate
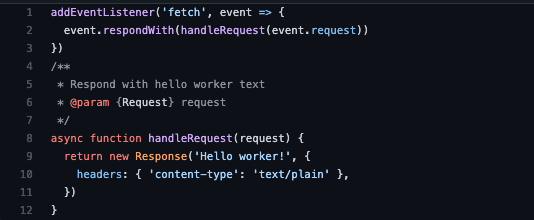
If you don’t pick any one of the starters, then by default, you will be set up with a hello world starter. So if you run generate my-worker you will be set up with a new project.
In the `Index.js` file below you will find a default serverless function that adds an eventListener to the DOM for an event and on line 9 you can see the response to the request is to return “Hello worker” to the DOM as type text/plain. You can also return a text/html in the header. We will see this later on in this tutorial.
Setting up Dummy links
Since you want to display links on a screen you can start by having an array of links that we can display on the screen using some of the worker APIs
var links = [
  { name: 'Twitter', url: 'https://twitter.com/Obinnaspeaks' },
  { name: 'LinkedIn', url: 'https://www.linkedin.com/in/ekwunoobinna/' },
  {name: 'Polywork', url: 'https://timeline.obinnaspeaks.dev/'},
  { name: 'Website', url: 'https://www.obinnaspeaks.dev/' },
]
The first runtime API we will look into is the HTMLRewriter, this gives you a jQuery-like experience directly inside of your Workers application. The HTMLRewriter has two major handlers but for the purpose of showing our links in the DOM we will be focused on the element handler.
Create handler for displaying links
Since you are dealing with multiple links, in the Elementhandler we named LinksTransformer, you will need a constructor so as to handle the context of these links.
The code block below allows you to get each of the links from the array of links and append it to a an element we haven’t defined yet. If you look closely you can see that we have an append method on the element.
This is because you want to add the links right before the end tag to a html element. There are a list of methods that can act on element handlers, you can find more information in the documentation. We use the {html:true} to render the links as actually html.
  class LinksTransformer {
    constructor(links) {
      this.links = links
      }

  async element(element) {
    for (let link of links) {
        element.append(`<a href="${link.url}"> ${link.name}</a>`, { html: true })
      }
  }
}
After you have created the element, you will need an async handler to process it by making a fetch request to https://static-links-page.signalnerve.workers.dev.
You can see that the elementhandler acts on div#links element as seen below.
The response from this URL will be a static HTML page that you can enhance using HTMLRewriter as you will see further down the line.
async function handleRequestForOthers(request) {
  const html = await fetch('https://static-links-page.signalnerve.workers.dev')
  var rewrter = new HTMLRewriter()
    .on('div#links', new LinksTransformer(links)).transform(html)
  return new Response(rewrter.body, {
    headers: { 'content-type': 'text/html' },
  })
}
Now if you run your site locally in preview mode using the wrangler preview command. You should see your links displayed.

Yaayyyy!! We have links up!
If you look at the console, you will notice some HTML on there, this is as a result of the API endpoint we are fetching from and if you look even more closely you can see our links added.
- Since we are in preview mode if you click on the links it will return a broke page. To be able to deploy this to your worker account run wrangler publish

If you look closely there are a couple of more elements we can manipulate so let’s do this.
Manipulate HTML tags using HTMLRewriter
Seeing as there are are some HTML tags that we can manipulate further, let’s see how you can manipulate this further and use more HTMLRewriter methods to style your linktree.
Display Image
The first part of the div shows an image tag and some styling in the parent div . You can do this by creating another element handler and call it ProfileTransformer .
From the code below you can see that we call a removeAttribute method on an element.
class ProfileTransformer {
  async element(element) {
    element.removeAttribute('style')
  }
}
Add image source to Img tag
To display an image on top of the links, we had an image source to the img tag. The Img tag take has an id of avatar, you can create another elmenthandler for manipulating inner attributes of elements and you might want to make it reusable, so you will use a constructor.
In the code block below, we take an attribute and a value and use the DOM method setAttribute to add this to our element.
class AttributeTransformer {
  constructor(attr, value) {
    this.attr = attr
    this.value = value
  }
  async element(element) {
    element.setAttribute(this.attr, this.value)
  }
}
After you have done this, you will want to update your async handler by using the on function. You are calling the above functions to the div#profile and img#avartar elements respectfully.
async function handleRequestForOthers(request) {
  const html = await fetch('https://static-links-page.signalnerve.workers.dev')
  var rewrter = new HTMLRewriter()
    .on('div#links', new LinksTransformer(links)).transform(html)
    .on('div#profile', new ProfileTransformer())
    .on(
      'img#avatar',
      new AttributeTransformer(
        'src',
        'https://res.cloudinary.com/ekwuno/image/upload/w_1000,c_fill,ar_1:1,    g_auto,r_max,bo_5px_solid_red,b_rgb:262c35/v1611487810/IMG_6312.jpg',
      ),
    )
  return new Response(rewrter.body, {
    headers: { 'content-type': 'text/html' },
  })
}
Now if you run wrangler preview you can see this

Yayyyy! Another milestone. We have Image in!
Display Text to screen
Another thing you can notice is that you have a h1 tag that you can manipulate again by repeating the steps we have seen from above. This time you will be using a prepend method.
class TextTransformer {
  constructor(name) {
    this.name = name
  }
  async element(element) {
    element.prepend(this.name)
  }
}
Then we update the API request to add this handler to the HTMLRewriter
- You can see that I also updated the title of the page using the TextTransformer
async function handleRequestForOthers(request) {
  const html = await fetch('https://static-links-page.signalnerve.workers.dev')
  var rewrter = new HTMLRewriter()
    .on('div#links', new LinksTransformer(links)).transform(html)
   .on('div#profile', new ProfileTransformer())
    .on(
      'img#avatar',
      new AttributeTransformer(
        'src',
        'https://res.cloudinary.com/ekwuno/image/upload/w_1000,c_fill,ar_1:1,    g_auto,r_max,bo_5px_solid_red,b_rgb:262c35/v1611487810/IMG_6312.jpg',
      ),
    )
  .on('h1#name', new TextTransformer('obinnacodes'))
  .on('title', new TextTransformer('Obinna Ekwuno'))
  return new Response(rewrter.body, {
    headers: { 'content-type': 'text/html' },
  })
}
When you run wrangle preview , you can see that we have names displaying!

Change background color
Seeing as you have already defined an AttributeTransformer we can pass it into the HTMLRewriter.
async function handleRequestForOthers(request) {
  const html = await fetch('https://static-links-page.signalnerve.workers.dev')
  let rewrter = new HTMLRewriter()
    .on('div#links', new LinksTransformer(links))
    .on('div#profile', new ProfileTransformer())
    .on(
      'img#avatar',
      new AttributeTransformer(
        'src',
        'https://res.cloudinary.com/ekwuno/image/upload/w_1000,c_fill,ar_1:1,g_auto,r_max,bo_5px_solid_red,b_rgb:262c35/v1611487810/IMG_6312.jpg',
      ),
    )
    .on('h1#name', new TextTransformer('obinnacodes'))
    .on('div#social', new SocialTransformer(svgs))
    .on('div#social', new ProfileTransformer())
    .on('title', new SetTransformer('Obinna Ekwuno'))
    .on('body', new AttributeTransformer('class', 'bg-red-400'))
    .transform(html)
  return new Response(rewrter.body, {
    headers: { 'content-type': 'text/html' },
  })
}
and if you run preview you can see the new color change.

To be able to use the links run wrangler publish.
Conclusion
In this tutorial, we have looked at how to use Cloudflare workers to create a linktree application by using serverless functions and the HTMLRewriter Runtime API and some of its handlers.
I hope to see more examples of using workers in your applications, please tell me what you build. I am always happy to pair with you. Happy coding 💜


